Azure Clustering Overview #
The following article describes how to set up advanced load balancing services with RELIANOID Load Balancer for high availability in Azure Virtual Machine Infrastructure. We are going to describe the procedure to configure a RELIANOID Cluster and configure a TCP load balance profile for load balance HTTP services with a farm of backend servers.
Cloud Load Balancer Clustering Environment #
This time, we are going to demonstrate how it could be applied in azure using Azure services. The following diagram describes the architecture we want to deploy. A web load balancing with RELIANOID Application Delivery Controller in Azure.
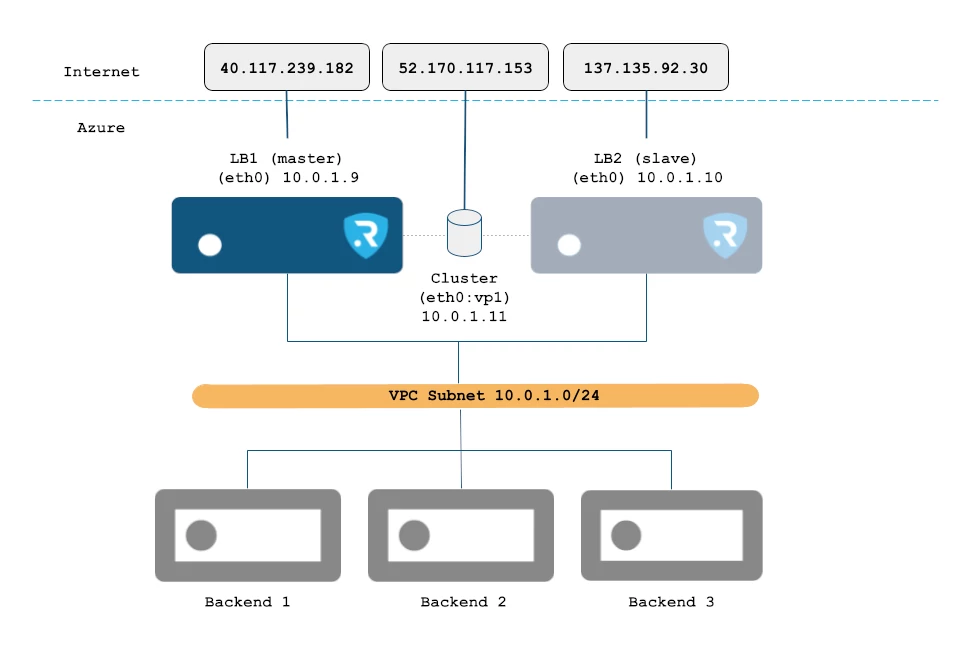
Each RELIANOID VM will be configured with one Network Interface eth0 and with both a Public and a Private IP.
LB1 is assigned to 10.0.1.9 as Private IP and 40.117.239.182 as Public IP.
LB2 is assigned to 10.0.1.8 as Private IP and 137.135.92.30 as Public IP.
Also, an additional Virtual IP (type Secondary) is assigned to LB1 with name eth0:vp1 and Private IP 10.0.1.11, which will be used to configure a virtual service or farm for load balancing and will be included as part of the cluster to create high availability. Only one node of the cluster will be assigned to such Virtual IP at a time, the current master (or active) node. Such Virtual IP is accessible through the Public IP 52.170.117.153, which is used by the users to connect to the published virtual service.
The backends, which allocate the real application, are setup as cloud VMs in the private network 10.0.1.0/24. This way, the real servers are not exposed to the Internet.
Implement Cloud load balancer Clustering in Azure #
To set up the depicted architecture, we’ll deploy two instances of the RELIANOID Load Balancer, accessible through the Azure Marketplace. Simply navigate to the Azure portal’s homepage, select Create a Resource, and search for the RELIANOID Load Balancer product.
You can customize each VM parameter for the load balancer nodes similarly to any other virtual machine. Here are the key considerations:
Size: For our needs, B1ls is adequate.
Network Interface: An associated network interface is created for each load balancer machine. Set up its public IP, private network, and security group in the balancer creation form. Remember that the public IP is essential for accessing the graphical user interface (GUI). Ensure that the selected virtual network matches the one where the other balancer and backends are situated, as each virtual network is isolated from others.
Managed Identity: IT is required to enable a system-assigned managed identity. In the Management section, enable the Identity option. For that, your account needs the Virtual Machine Contributor role assignment. For more information about this section, please refer to the Configure managed identities for Azure.
After the deployment of the RELIANOID load balancer VMs where the Instance Status are showing Running mode, some configurations are needed for accessibility and clustering:
1. Security Groups: RELIANOID uses the TCP port 444 for HTTPS web GUI management purposes and the TCP port 22 in SSH for command-line management and clustering services. In addition, each Virtual Port used in the load balancer virtual services will be required to be included in your security group. In this case, we have to configure the inbound rule to allow incoming traffic at the TCP port 80 in order to get access to our backends HTTP services. These network configurations can be configured in a network security group.
2. Managed Identity Access: For the clustering it is required to grant access to the resources using Azure RBAC. Navigate to the desired resource and select Access Control (IAM) then select Add > Add role assignment. In this section, select the Virtual Machine Contributor role in the Role > Privileged Administrator roles. In the next tab Members select Assign access to Managed identity and click on + Select Members. Finally, select the Subscription, Virtual Machine as System-assigned managed identity and select both load balancers VMs. Click on Select, then Next and finally Review + assign.
3. Network Interfaces: Look for the Network interfaces created for both VMs and click on the IP configurations section. In the Master node (LB1), we need two different IP addresses: A Primary private and public IP, and one or more Secondary virtual private (and optional public IP) assigned to the clustering service used for HA load balancing purposes. In the Slave node (LB2), only the Primary will be needed, as the RELIANOID clustering service will change the Secondary in the active node (node with current Master role).
After the IP addresses have been configured, the virtual Load Balancers will be accessible as follows:
LB1 will be accessible through https://40.117.239.182:444 user root and password the instance id.
LB1 will be accessible through ssh in IP 40.117.239.182, this is configured at Virtual Machine deployment time.
LB2 will be accessible through https://137.135.92.30:444 user root and password the instance id.
LB2 will be accessible through ssh in IP 137.135.92.30, this is configured at Virtual Machine deployment time.
If you consider changing the hostname before continuing, please reboot the Virtual Machine instance to apply changes.
When the access to the web GUI is done successfully you will see two important values, the hostname, and the Certificate Key, both pieces of information are unique per Load Balancer and are related to the Activation license; use this information in the following URL as described: https://www.relianoid.com/activate-enterprise-edition-cloud-evaluation/.
Once the form is filled out, the browser will download the activation certificate. Please, upload the received PEM activation license through the web GUI in each load balancer. Once done, the web GUI is unlocked and all the features are totally enabled and operational. Do the same activation procedure in both nodes LB1 and LB2.
Now we are ready to configure the RELIANOID Cluster service. Go to the Load Balancer web GUI in LB1 through the assigned public IP https://40.117.239.182:444, section System > Cluster to fill the following form:
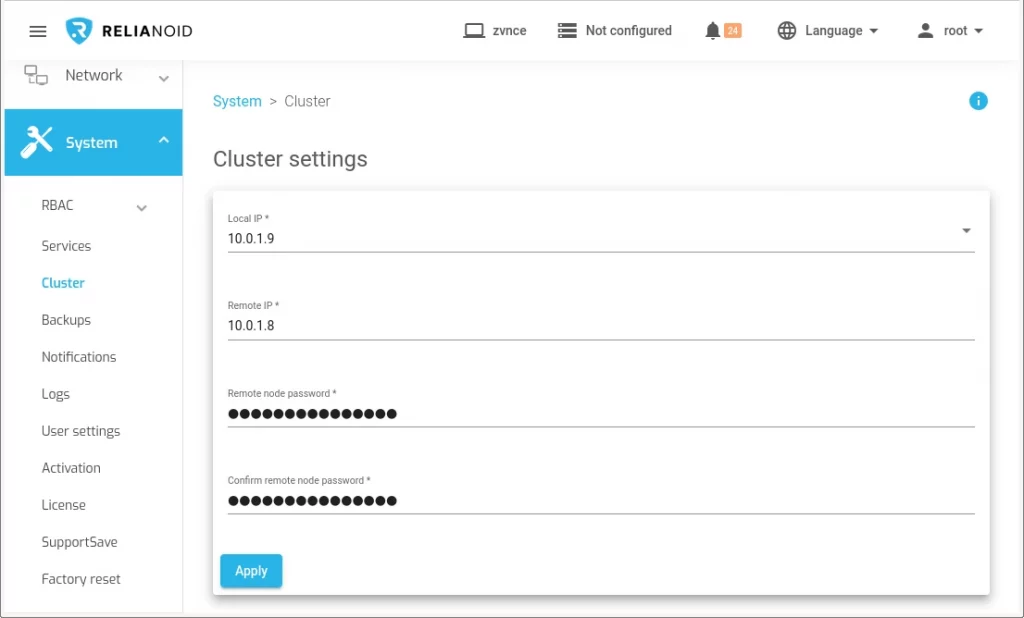
Configure cluster:
- Local IP: select the IP and NIC of eth0.
- Remote IP: enter here the IP of eth0 in node LB2.
- Remote Node Password and Confirm Password: enter here the root password for ssh in the other node, by default the instance ID of LB2.
Click on Generate button and wait a few seconds meanwhile the node where you run the configuration is going to take the Master role (LB1) and the other (LB2) is going to take the Slave role.
Create a load balancing service in Azure #
At this point, RELIANOID Cluster has been configured in Azure and it is ready to work, so let’s configure our first clustered load-balanced service, a simple network load balanced service for web applications. Go to LSLB > Farms > Create Farm with the following parameters.
Take into consideration that the used Virtual IP 10.0.1.11 is the Virtual IP configured previously and a resource of the cluster which will be reachable always from the Master node. Press Apply and continue configuring the section Services with the backends Private IP address.
Use IP persistence with a timeout of 60 seconds just in case you need to guarantee that the same client IP will be connected to the same backend over a certain period of time. Configure the advanced health checks with FarmGuardian. Use check_tcp as a simple health check to verify that the TCP backend port 80 is opened in each backend. And then, add the backend servers internal IPs and port where the real web services are running.
Now test the connection to the Public IP http://52.170.117.153/ assigned to the internal IP 10.0.1.11, the connection will pass through the load balancer using the eth0:vp1 and forwarded to one of the available backends.
Then, force to change the Master role in the cluster, for example, reboot the node with this role, the other will take the virtual service and connect again to the public IP. The current and new client connections will be established against the same backend but this time through the new Master node.
Troubleshooting: This host has not assigned a System Identity #
If you receive the message: “This host has not assigned a System Identity. Please configure it in Azure Portal“, it indicates that either the Azure client waagent, the azure-cli, or the System Identity has not been set up properly for the load balancer. To troubleshoot this issue, please try the following commands from the load balancer:
root@noid-ee-01:~# systemctl status walinuxagent
root@noid-ee-01:~# az login --identity
root@noid-ee-01:~# az account show

If the waagent and azure-cli are not installed on the system, please execute the following commands:
root@noid-ee-01:~# apt-get install waagent azure-cli
Enjoy advanced load balancing and clustering in Azure with RELIANOID!


